Skip to Main Content
WAB Faculty & Staff

Teachers Edtech: Forms

Find out about WAB's tech systems, tools and subscriptions and how to use them

How to use forms

Sign in to Microsoft Forms

  • Create surveys, quizzes, and polls, and easily see results as they come in.

  • Invite others to respond to your form using any web browser, and even on mobile devices.

  • Use built-in analytics to evaluate responses as they're submitted.

  • Export form data, such as quiz results, to Excel for additional analysis or grading.


Sign in

Sign in with your Office 365 school credentials.

Get started button on Microsoft Forms homepage

Create a form in Microsoft Forms

Create a form

  1. Under My Forms, select New Form or New Quiz.

    Note: If you're using Microsoft Forms Pro, you can create an advanced survey. Learn more.

  2. Enter a name for your form. You can also enter an optional subtitle for it.

  3. Select Add Question to add a new question to a form or quiz. You can choose to add ChoiceTextRating, or Date questions.

    • For choice questions, enter the text you want to display for the question and each of the choices.

  4. Select Preview at the top of the design window to see how your form will look on a computer or mobile device.

A form choice question displayed with options

Preview computer mode for a class survey form

Send a form in Microsoft Forms

Set authentication setting

By default, only people within your organization can submit responses to your form or quiz. If you want to allow anyone to submit responses, select the drop-down Only people in my organization can respond and then select Anyone with the link can respond. You can toggle between these two settings by selecting the drop-down.

Note: Anyone with the link address will be able to see and complete your form or quiz. Be sure you're comfortable sharing the contents before changing this default option.

Note: Only people in my organization can respond setting is only available for Office 365 Education and Office 365 Commercial subscribers. To access this setting, please sign in with your school or work account.

Select who can respond to your form

Send a form link to others

If you don’t have the email addresses of the people you want to view your form or quiz, or if you don’t want to use email for this purpose, you can easily copy a custom link that lets you send your form to others.

  1. In Microsoft Forms, open the form you want to send and select Share.

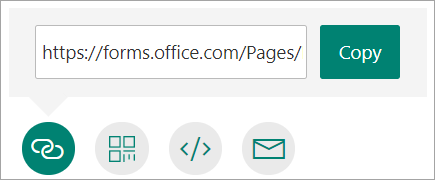
  2. Make sure the Link button is selected, and then click Copy next to the text box that displays a form URL.

  3. Copy and then paste this link wherever your intended audience can see and select it to gain access to your form or quiz (for example, a shared class notebook).

Copy a link to your form

Send a form QR code

  1. In Microsoft Forms, open the form you want to send and select Share.

  2. Select the QR button to view a QR code for your form.

  3. Select Download and then paste this link wherever your intended audience can scan it with a QR code scanner, such as a mobile device, to gain access to your form or quiz (for example, a shared class notebook).

Send a QR code to your phone that recipients can scan on a phone or tablet

Embed in a webpage

  1. In Microsoft Forms, open the form you want to send and select Share.

  2. Select the Embed button.

  3. Click Copy next to the text box that displays the embed code, and then type or paste this embed code into a blog or web page to embed your form within the document.

Copy a link to your form that you can embed in a webpage or Sway

Invite others through email

  1. In Microsoft Forms, open the form you want to send and select Share.

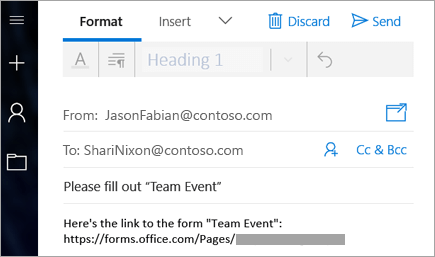
  2. Select the Email button.

  3. When your default email editing application opens, type the email addresses of the people you want to view your form in the To box of your email editor. Microsoft Forms includes a brief note for the recipient in the email body so they have proper context for your invitation and a link to your form.

  4. When you’re ready to send your form or quiz invitation, select Send.

Note: Anyone who receives the form link through email will be able to forward that email to other people where they can see and complete your form. Be sure you're comfortable sharing the contents before sending the link.

Send a link to your form in an email

View results in Microsoft Forms

View results

After you create your form, adjust its settings, and share your form with others, it’s time to view the results. Open the form for which you want to review the results, and then select the Responses tab.

  1. Select View results to see individual details for each responder, such as time it took to complete your form and the option(s) selected.

  2. To easily view all of the response data for your form in Microsoft Excel, select Open in Excel.

  3. Select the More Details link to see the name of each responder and his or her answers for each question.

View specific results, such as name and time to complete, per responder